How Can We Help?
Publishing to a SeriesPublishing to a Series
Introduction
The most basic publication type in Digital Commons is the “series.” Series can accommodate a wide variety of content from faculty work to special collections. Whether they function as standalone publications or as building blocks within larger collections, they provide the same full set of publishing tools and capabilities for administrators.
This guide is designed for both site administrators working with series and series-level administrators who manage content for specific departments or subjects.
In addition to series, Digital Commons offers a number of other publication types for showcasing your content and collections.
Access Series Administrator Tools
To access your administrator tools, first log in following the steps described in the Accounts and Authentication guide.
Once you have logged in to your account, you will have access to series management tools that allow you to upload and manage submissions and configure the series. If you have administrator privileges to access reports for your series, you’ll also see a link to the Digital Commons Dashboard. Find these tools on your My Account page or using the Administrator Toolbar along the top of the page when browsing the series.
Repository administrators can also access series tools via the site configurations. However, they will not see series-specific options on the My Account page unless they are also added as administrators to individual series.
Administrator permissions:
Site and series administrators are able to view a particular set of repository management tools by default. See Managing Administrator Permissions for more information. If you would like to adjust the types of permissions that individual administrators have, please contact Consulting Services.
Upload to a Series
There are two ways to manually upload content to the site:
- Upload and post submissions on behalf of authors. For administrators interested in the batch upload features of Digital Commons, see Batch Upload, Export, and Revise.
- Authors may submit their own content, which you then review and post if appropriate. The upload process for authors is covered in Author Submission Steps in Digital Commons.
To reach the submit form:
- Click Upload in the series tools on your My Account page, or
- You may also click the Upload Submission tab from any series configuration page.
Submission Form Fields
The basic series fields are described below. It is possible that your submission form has additional fields or that some fields have customized display labels. If you need to change the existing fields or add to them, notify Consulting Services.
Authors
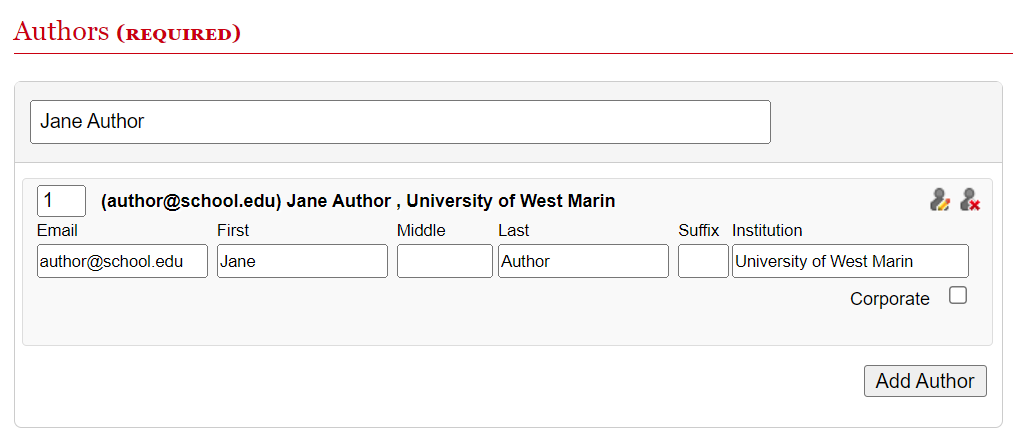
To add individual author names to a submission:
- Begin typing the first name, last name, email address or institution of the author. If the author was previously entered into the system, an entry for the author will appear in the drop-down. Click the correct entry, and the author’s name will be added to the submission.
- If an entry for the author does not appear in the drop-down, you can add the author manually by filling out the available fields.
- Click “Add Author" and repeat this process to add co-authors.
- To edit an author, click the pencil icon to the right of the name.
- To remove an author, click the “x” icon to the right of the name.
- To reorder authors, change the number in the box above the author name.
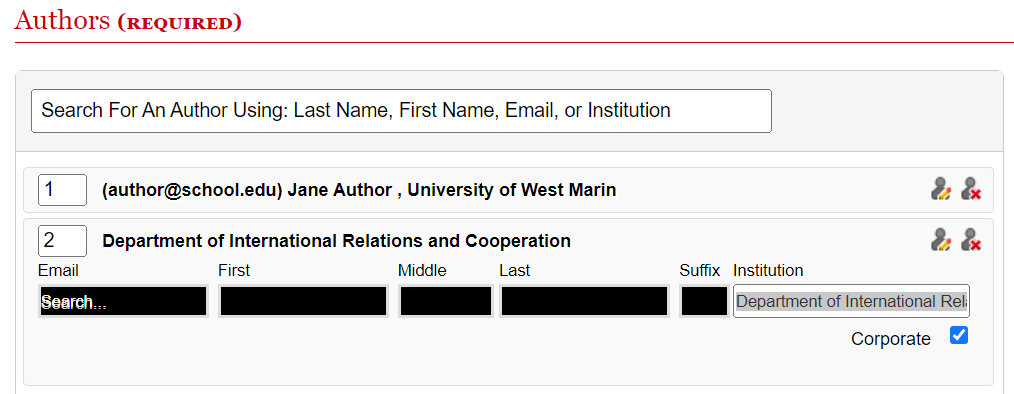
To add corporate or institutional authors to a submission:
- Begin typing the name of the corporation or institution. If the information was previously entered into the system, it will appear in the drop-down. Click the correct entry, and the name will be added to the submission.
- If an entry for the corporation or institution does not appear in the drop-down, you can add it manually by checking the Corporate box near the Institution field and filling in the corporation or institution’s name.
- Click “Add Author” and repeat this process to add more corporate or institutional authors.
- Use the pencil icon to the right of the name to edit an author or the “x” icon to remove an author.
Upload File
If your submission includes an electronic file or a link to one, you may add it here. Choose one of the following:
- Upload a file: If you have the full-text file on your computer or network, select this option, and use the Browse button to locate and upload the file into the series. PDF is the default format for text documents. If you provide a Word or RTF file, the system will convert it to PDF. (To make native files available instead when they are present, use the “Allow Native File Download” setting described in the Configuration Tab section.)
- Import file from remote site: If the file is publicly accessible, select this option, and paste the URL of the file in the text box that appears.
- Link out to remote file: To point to a web resource, or to a file that is online but not publicly accessible, select this option. Paste the URL in the text box that appears. A “Link to Full Text” button will appear on the article page instead of a “Download” button.
Other standard metadata fields
Title:
Enter the title of the submission exactly as you would like it to appear on the web (including the correct capitalization and punctuation).
Abstract:
The abstract provides a summary of the subjects covered in the document. By default, the abstract field is enabled to accept basic rich HTML. You can type or cut and paste text that you would like to include in the abstract field. Format elements of the abstract using the field’s toolbar. Choose the HTML option to enter your own code.
Comments:
If present, enter any comments that you would like to appear on the web page for the submission. For example, “Forthcoming in Harpers, 2017.”
Disciplines:
These allow the submission to be grouped with others in the same field on the Disciplines page of your repository. For more information about disciplines see Disciplines: Digital Commons Three-Tiered Taxonomy of Academic Disciplines.
Keywords:
The words you enter/select will help visitors find accurate results when they search the repository. Separate keywords with commas.
Publication Date:
If you know the year of publication, you may enter it here. The other fields are optional. If your series is sorted by publication date, this will affect where on the series index page the document will show.
Publication Status:
If present, use the yes/no buttons to indicate whether the submission was published in a journal.
If yes, the system will automatically generate an OpenURL and post a “Find in Your Library” link on the article page. The OpenURL is helpful if a document is already online (e.g., a publisher’s website), and for copyright reasons, the author cannot upload it to the repository. If this option is enabled, visitors will be directed via the OpenURL to the available copies of the document.
Submitting the Form
After completing the submission form, click the Submit button. If you have supplemental files to post, first check the box next to Please check this if you’d like to add additional files.
Including additional files?
If you selected the additional files option on the main upload form, the next screen will allow you to add your files. You’ll be prompted to locate, upload, and enter descriptive text for each additional file you would like to include. You may also choose whether you’d like the files to appear publicly and the order in which they should do so.
After all additional files have been uploaded and labeled, click Continue to finish the submission process.
To make adjustments at any time, you may use the Supplemental Content link in the sidebar of the Submission Details screen. See “Manage Additional Files” below for details.
Confirmation screen
After you complete your submission, the confirmation screen summarizes your metadata and lists your options:
- Revise Submission: Returns you to the submission form to make any changes.
- Make Another Submission: Begin a new submission.
- Manage All Submissions: View and manage all submissions uploaded to the series. Choose this option if you are not yet ready to publish the item live on the repository, but would like to continue to work with it or other submissions.
- Publish & Update Selected: If no revisions are necessary, you can publish the item to the repository and make it visible to the public immediately by choosing this option. If making multiple submissions, all items with marked checkboxes will be published at once.

When are complete submissions published to the repository?
Once items are submitted to the repository, they can be published to the site for visitors to download and read. The term “post” is used to describe the action of making a submission visible to the public.
There are two ways to post a submission:
- Immediately after submitting via the upload form: When submitting on behalf of authors, administrators can “post” immediately by using the Publish and Update Selected option on the submission confirmation screen. All items with marked checkboxes will be posted, and a series update will automatically be queued.
- By using the repository’s submission management tools: Using the Post link on the Submission Details page, administrators can publish individual submissions to the repository at any time. Steps are described in the “Working with Individual Submissions” section. This is recommended if a submission still requires author approval, publisher permission, or other actions before publication to the web. A manual update is required after posting.
Administrators will receive an email when the submission is posted and when the update has completed.
Managing Submissions
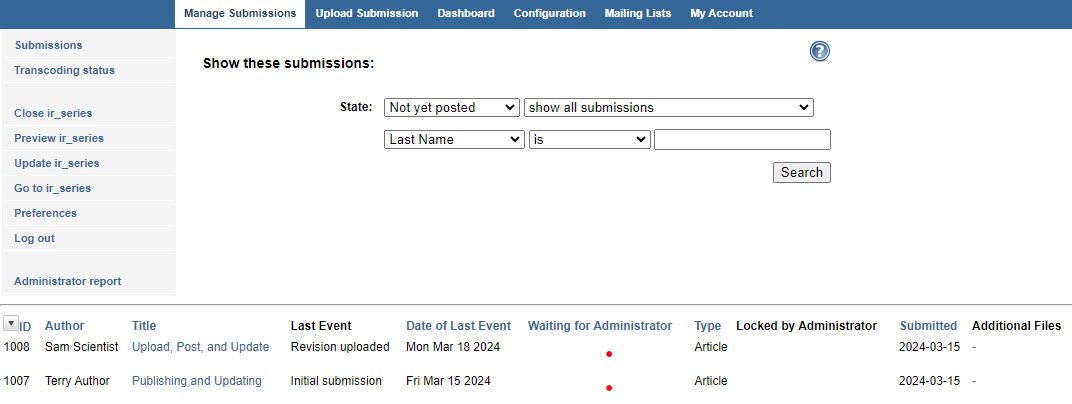
Series administrators can view all pending submissions by following the Manage Submissions link on the My Account page or on the Administrator Toolbar when browsing the series. You may also select the Manage Submissions tab from any series configuration page.
Browse and search series submissions
The Manage Submissions screen defaults to display documents which have not yet been posted. Use the State drop-down menu to adjust the list of submissions shown. Options include: Not yet posted, All, Queued for update, Posted, Rejected and Withdrawn.
You may also search for documents based on criteria available in the field drop-down menu. Click on the underlined column headings to sort results or to reverse the sort order.
To re-arrange or re-label the columns to suit your workflow, use the Preferences link in the sidebar. Changes to preferences only affect the current administrator’s settings, and don’t modify what other series administrators see.
Manage Submissions screen:
View submission details
From the Manage Submissions screen, click on the title of the submission to reach its Submission Details page.
The Submission Details page shows comprehensive information about the submission, as well as links to download the electronic files, if any.
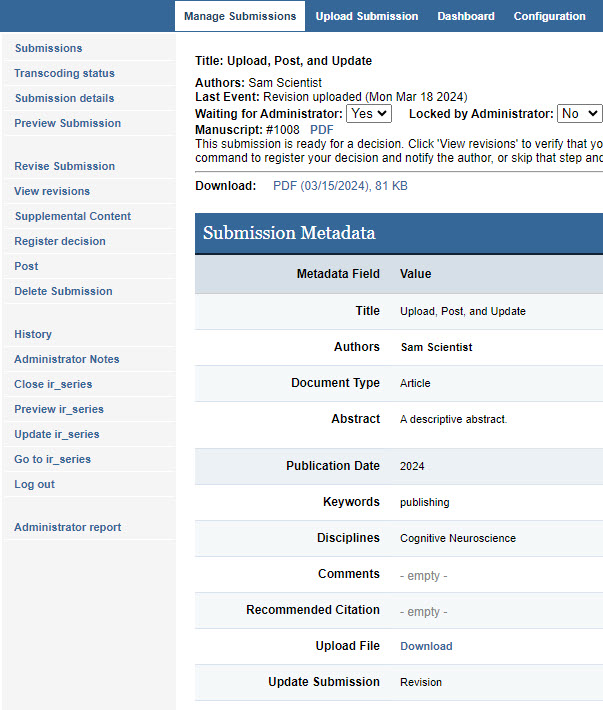
Most of the data shown under the title will be self-explanatory, but the following tips may be helpful:
- Waiting for Administrator: In the Manage Submissions view, the system automatically displays a red “Waiting for Administrator” dot beside submissions that may require administrator attention (e.g., the author uploaded a revision, a reviewer posted a review, etc.). You may override that designation by changing the menu here from Yes to No, or vice versa.
- Locked by Administrator: If you change this to Yes, the author will be immediately unable to use the Revise submission link shown in Author Tools. To restore the author’s ability to revise his or her submission, change the menu back to No.
- Download: Depending on your series configuration, you may see different options beside Download. The default is to display the most recent PDF version of the submission, including a system-generated title page and header/footer. The native file format is also available for download, if present.
The left-hand sidebar of the Submission Details page provides the following options to post, revise, and track progress for the submission.
Note: Some links are visible only after certain actions have been completed, and some links correspond with optional features enabled for your series. Please contact Consulting Services to learn more about individual links or features.
Post a submission
Use the Post option in the Submission Details sidebar when you are ready to post a document publicly. Then run an update to finalize.
This option is typically used when an author uploads a submission, since author submissions must be approved by an administrator before they are published to the repository. If a different administrator uploads a submission, but doesn’t publish it, this workflow will also apply.
The other way for an administrator to post a submission is to use the Publish & Update button, which appears on the confirmation screen after completing the submit form. That method combines the post and update steps into one.
Revise a submission
To make a change to a submission, you may submit a revision. If your series allows it, you may also display previous versions of a submission on the site (see “View Revisions” below).
- From the Submission Details page, click Revise Submission in the sidebar.
- Change the necessary elements on the form, enter a brief summary of changes in the Reason for update field, and click Submit.
- If the document is already posted to the site, click the Update button in the sidebar to ensure that changes display publicly.
View revisions
The View Revisions link in the Submission Details sidebar provides access to multiple tools for managing the submission's files and versions.
The Download Link Behavior tool allows you to change which file is available publicly via the Download button on the article page. You can also select metadata-only using this tool. The “Native” option appears when a non-PDF file has been uploaded to the submission. The “PDF” option appears when a PDF has been uploaded directly or when a document such as a Word file has automatically converted to PDF.

Also on the View Revisions screen is the Revision History table, which provides information about the original submission and each revision that occurs, including the user and the time of the submission/revision.
 When a revision includes a file such as a PDF, that file is automatically made available via the Download button in place of the earlier file, once you update the series. You can select the button for a previous file in the table if you'd prefer to make an earlier version available for Download instead.
If desired, you can also enable a Previous Versions feature for a series by contacting Consulting Services. This option allows you to display earlier drafts in a “Previous Versions” section of the public article page by selecting Show from the drop-down menu. The text field next to the menu allows you to input text to describe the previous version (e.g., First draft, December 2025); otherwise, the system displays the date it was originally posted.
Manage additional files
If there is supplemental content that should accompany a submission, the system enables you to add it in an Additional Files section of the article page. You may submit these supplemental files at the time you make the original submission or add them via the Submission Details page at a later date.
To add, remove, or revise supplemental files for existing submissions:
- Click on Supplemental Content in the sidebar of the Submission Details page.
- Select and upload a file from your hard drive or network using the Choose File button.
- Enter a description for the file, if desired.
- Use Sort if you wish to change the order of multiple supplemental files.
- If you do not wish the file to show on the live site, uncheck the Show option.
- When all of your supplemental files are uploaded and in the correct order, click Save.
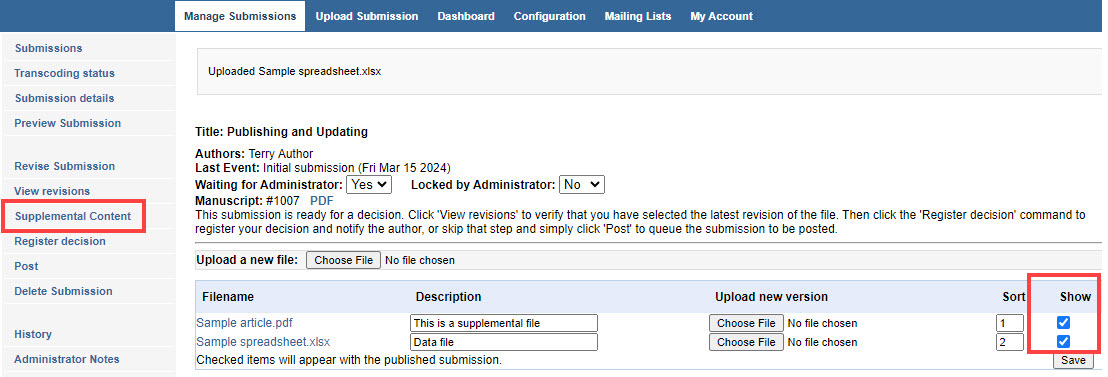
To see whether a submission has additional files:
You can check at a glance whether series submissions have supplemental content by viewing the Additional Files column on the Manage Submissions screen.

The Submission Details screen for each submission will also list any additional files at the bottom of the metadata summary.
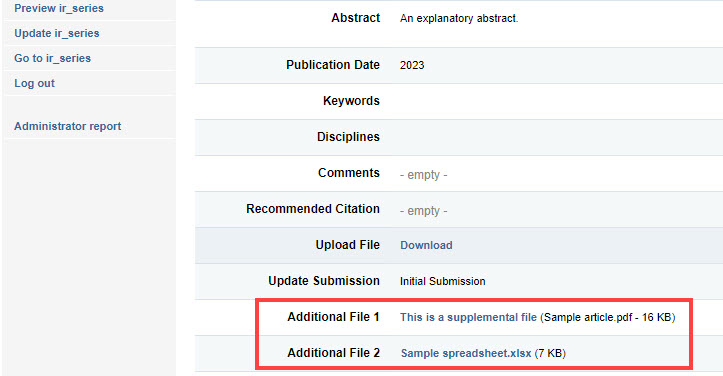
Additional sidebar options for a submission
Administrator Notes:
To leave a reminder for yourself or another administrator, add notes here. The most recent note will show on the Submission Details page but will not be published on the web.
Administrator Report:
This tool allows administrators to generate an Excel spreadsheet with selected information about submissions in the series. (For download reports, see the section, “Tracking Series Readership with the Digital Commons Dashboard.”)
Go to ir_series:
Brings you to the series homepage.
History:
This page provides an overview of the submission’s activity and allows you to add notes for later reference. The notes will not be visible to the author.
Preview ir_series:
Allows you to view the series homepage before changes are live. Note: The preview will only show submissions that have been posted and then updated. If you would like to see a submission’s article page before it is posted, click on the Preview submission link, also in the sidebar.
Preview Submission:
This link displays the submission as it would appear in your repository once published. Some information may be unavailable until the submission is posted.
Register Decision:
To send the author(s) your comments, you may choose Register Decision from the links on the sidebar. It is not required to send a decision letter for any submission.
- From the Submission Details page, click on Register Decision.
- Select the type of letter you wish to send from the drop-down menu:
- Accept: Choose this letter for submissions you intend to publish “as is.”
- Accept with Minor Revisions: Choose this letter for submissions you intend to publish after minor changes are made.
- Major Revisions Required for Acceptance: Choose this letter for submissions you are considering, but which require significant changes.
- Reject: Rejected submissions can be neither revised nor accepted afterwards so this decision should be used with some caution.
- Change any of the boilerplate text as needed and click Register Decision on the right-hand side of the page to send the letter.
- A copy of the decision letter will be available via the Decision Letters link, visible only after a decision letter has been sent.
Submissions:
This link returns you to the main Manage Submissions view.
Update ir_series:
When you make changes to an item within a series or to series configurations, you’ll need to run an update to ensure these changes display publicly on the site. Run an update when you revise articles, post new submissions, or make changes to article and series display settings through the configuration tab.
Updates at the series level affect only the series and items within it. You will receive an email when the update has completed. You may need to refresh your browser in order to see the changes you have made.
Withdraw Submission:
This link allows you to withdraw an entire submission on behalf of an author. This is helpful if the author has made duplicate submissions. Once removed, the submission cannot be posted, so this option should be used with caution. This option changes to Remove Submission after a submission has been posted.
- Click the Withdraw Submission link in the sidebar.
- Choose the Do not notify authors button to confirm your selection without sending the letter suggested on the screen, OR choose the Notify authors button to confirm your selection and send the letter displayed to the author, if an email address was provided with the submission.
- Click the Withdraw Submission button to complete the withdrawal process.
- Note: If you would like to provide visitors with additional instruction, use the Revise Submission link to update the Comments field (e.g., “As of Dec 12, 2013, this manuscript is available only through the publisher’s website at…”), and then use these steps to remove the submission that has already been posted.
- The submission will automatically move from the Not yet posted state to the Withdrawn state.
- Click the Update link, if you are withdrawing a submission that has been posted. Once the series has been updated, the submission’s metadata will remain present at its current URL, but the link to download the file will be replaced with a notice to visitors that this document has been withdrawn.
Series Configurations
This section highlights several common settings and display options used within series. For more about the configuration options available in series, see “Publication-level configurations” in Digital Commons Administrator Configurations.
After modifying the options below, use the Submit Changes button to save your modification.
Note: Options that affect appearance or visibility will require an update for the changes to become visible to the public. The Preview ir_series and Update ir_series links in the left-hand sidebar allow you to confirm your changes are correct and then make your changes live.
Basic Settings:
- Introductory text: A text box for including cover text on the series home page.
- Extra sidebar link URL and Extra sidebar link display label: Fields for entering an additional sidebar link and the label for the link. This is great for linking to department pages and any external documentation on submission workflow for authors.
Publishing:
- Show link to submit form: If checked will add a “Submit Research” link to the sidebar of your series where authors may upload their work for consideration.
- Submission instructions and submission agreement: A text box to include information on author rights and any copyright agreement information you’d like to include. Standard HTML text formatting is accepted, including bold, italic, and super- and sub-scripts.
Review:
- Maximum number of reviewers per article: If included, the system will prompt editors to solicit the number of reviews indicated. Administrators may override this selection using the options provided on the Reviewers page of any submission.
- Number of days to submit a review: If completed, the system will prompt reviewers to complete their reviews in the number of days indicated. Administrators may override this selection using the options provided on the Reviewers page of any submission.
Additional Series Pages:
Using these text fields, administrators can customize the series Policies page and Final Manuscript Preparation Guidelines page. Standard HTML text formatting is accepted, including bold, italic, and super- and subscripts.
Administrators:
The Administrators link in the sidebar of the Configuration tab is used to add or remove series-level administrators. For details on adding an administrator, or modifying or limiting permissions, please refer to Managing Administrator Permissions.
 Digital Commons Help Center