How Can We Help?
Image GalleriesImage Galleries
The Digital Commons image gallery provides an effective way to showcase collections of photographs, artwork, and scanned images, making them an integral part of repository content. This guide provides instructions to manage images and use them to enhance the presentation of your Digital Commons site with gallery-powered slideshows and content carousels.
Upload Images
Administrators may upload individual images to an image gallery using the steps below. Image galleries also support the upload of multiple images at once using the batch import features built into Digital Commons. See Batch Upload, Export, and Revise for more information.
To upload an image as an administrator:

- Navigate to the Add Content tab, then click on Start uploading images. Gallery-level administrators may also use the Upload link on their My Account page to go directly to the submit form.
- Complete the required fields on the submit form (title, name of the creator, and year of creation), along with any other fields for which you have data.
- About “Geolocate” (optional): Enter an address, description, or longitude/latitude and click Search Map to locate the image on the map. After the images are posted to the gallery, visitors can view the image locations on a map or in Google Earth.
- To capture additional metadata or to remove options, contact Consulting Services. Specific metadata can also be hidden from the posted image’s webpage upon request.
- Upload the original, high-resolution version of an image (TIFF, JPEG, BMP, PNG, or GIF format) in the Upload File section. The system automatically generates a medium-sized version and a thumbnail version for display on the site. Visitors can also download the original, high-resolution version.
- Click Submit. The image has now been submitted, but not yet posted to the site.
- On the confirmation page, both creators and administrators are able to review the submission, revise the submission, and log out. They may also make another submission. Administrators have two additional options:
- Manage All Submissions button: Proceed to the Manage Images tab.
-
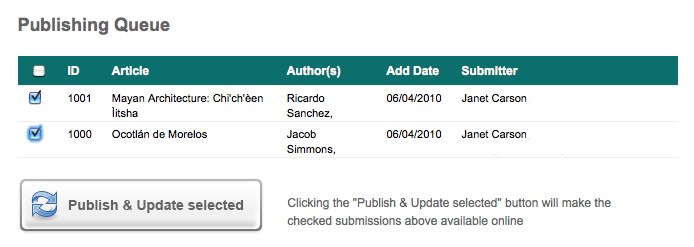
Publish & Update Selected button: Automatically posts and publishes checked selections to the image gallery. Items in the checklist include the image just uploaded and previously uploaded, unpublished images.

- Using the checkboxes, select the submissions to post, then click Publish & Update selected to add them to the image gallery. Unchecked items remain in the Publishing Queue and may be posted the next time you upload an image, or at any time via the “Post” method described in the next section.
Allowing author submissions:
If the submit link is currently enabled in the administrator configurations, creators can submit their images by clicking on the link in the gallery’s sidebar. The submit link is enabled by default and can be hidden by unchecking the “Show link to submit form” box on the image gallery Configuration page, then updating the gallery.

An administrator must approve and post submitted images before they are made publicly available. As part of this process, creators will need to accept a submission agreement, which is customizable either by administrators in the gallery configurations or with assistance from Consulting Services.
Manage Images
The Manage Images tab contains all of the images that have been uploaded to the gallery.

Once a creator submits an image, or an administrator uploads an image but doesn’t publish it, it will appear in Manage Images in the state “Not yet posted.” Use the State menu to see “Posted” or “All” submissions, or filter by field and click Search for faceted results.
To see details for an individual submission, click on the title of the image to view its Image Details page. There you may view the image’s metadata, download the full-size image, and find additional links to help with submission management.
Tip: If there are multiple administrators responsible for uploading and posting images, Consulting Services can enable an “assign” feature, allowing you to allocate the submissions to individual administrators and distribute the responsibilities.
Post an Image
Administrators will most likely post images immediately after upload, via the Publishing Queue that is built into the submission confirmation screen (described above). However, if creators are uploading their own images, or administrators need to go offline before posting, an administrator may post a previously submitted image at any time.
From the Image Details page:
- Click on the Post sidebar link.
- Click Continue.
- Press Update to make the image visible in the gallery. Updating will publish all images that have been posted but not yet updated, so it is only necessary to update once when posting multiple images.
Revise an Image
From the Image Details page, use the Revise Image sidebar link to enter any edits and then press Submit. If the submission is already posted to Digital Commons, you will need to use the Update ir_gallery link in the gallery sidebar to make your edits visible to the public.
Collect Images from Other Galleries
Administrators can post an image to one gallery and also “collect” the image to another gallery so that it is accessible from more than one location. This is ideal if you would like to present the image both in a gallery that includes all images from a given department and in a gallery that is dedicated to a certain subject area. For example, ACEReSearch showcases the history of its campus with an image gallery at https://research.acer.edu.au/acer_history/; using the collection feature, the acer_history gallery also includes images posted to its gallery of campus buildings at https://research.acer.edu.au/buildings/.
To learn more about collecting content from one publication to another in Digital Commons, or about automating the collection process based on configured fields, see The Collection Tool.
To collect a posted image to an additional gallery:
- In the gallery that does not yet feature the posted image, go to the Manage Images tab.
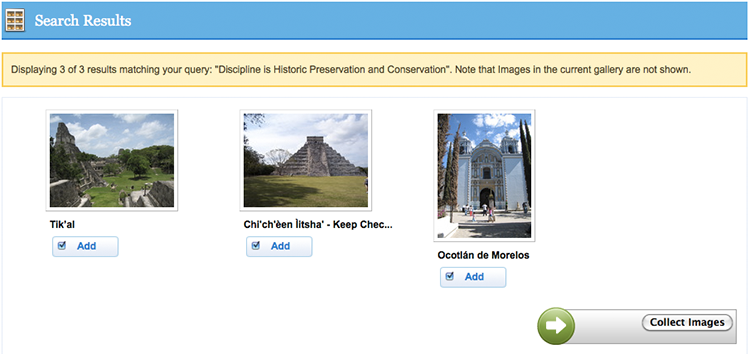
- Click Collect Images in the sidebar of the Manage Images tab. (Alternatively, you may go to the Add Content tab and click on Start image search.)
- In the Find Images box, enter a search term to locate the desired image(s). To restrict the search to specific fields, check the box next to the corresponding metadata type(s). Use the Search menu at the bottom of the form to search all galleries or just a specific one. When the search is correctly configured, click the Search button.

- Once matching images are displayed, click the Add button below an image to add it to the gallery. When you have done that for all of the desired images on a page, click Collect Images.

- Click the Update ir_gallery link in the sidebar to make the collected images visible.
To remove a collected image from a gallery:
Images added to the gallery via the “Collect Images” feature do not appear with other images in the Manage Images tab.
- To remove collected images, click the Manage Collection link in the Manage Images sidebar to display the collected images.
- Click the Remove option under any images you would like to remove from the gallery. (This does not change or delete the image in its original gallery.)
- Click Remove Images at the bottom of the screen to remove the selected images from the gallery.
- Update the gallery to make your changes visible to the public.
Browse Images
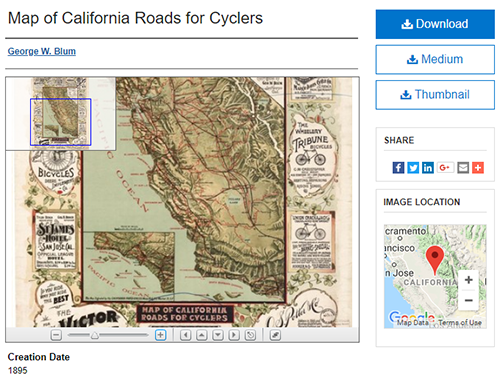
When images are published in a gallery, three versions are made available on the published image page. The original file is accessible via the “Download” button, and two additional versions are generated by the system: a medium-sized image and a thumbnail image. All three versions can be viewed or downloaded by clicking the corresponding buttons. In addition, the medium-sized version is used for the preview image if the pan and zoom viewer is still in the process of being generated. The thumbnail is used in the gallery browse list.
Image Pan and Zoom:
The preview on the individual image page appears in an interactive viewer that supports full pan and zoom operations. Using the tools at the bottom of the viewer, visitors are able to explore large, high-resolution images right in their browser. Images can be explored on the image page or expanded to full screen view and will display on both desktop and mobile devices. A navigation pane displays in the upper left of the viewer to help visitors monitor their location while browsing.
The pan and zoom viewer only displays in open access image galleries. Access-controlled galleries will instead display a static preview using the medium-sized version of the image.

Change Display Options
This section highlights the functions of several common settings and display options used within image galleries. For a detailed introduction to the configuration options in Digital Commons, see Digital Commons Administrator Configurations.
After making selections on the Configuration screen, click Submit Changes and then use the Update ir_gallery link to make changes visible on the gallery webpage.
Introductory Text:
This configuration adds descriptive text to the homepage of the gallery below the gallery title. Introductory text orients the visitor to the gallery and can also suggest related resources, if applicable. Administrators may enter plain text, use HTML to apply optional text formatting, or send the text to Consulting Services to format according to current web standards.
Extra Sidebar Link:
If you would like to display a link to an external website (e.g., a department or library website) in the sidebar of your image gallery, enter the URL and a display label for the URL into the fields provided.
Gallery Default View:
Visitors to the site have the option of browsing gallery images using the default grid view, optional list view, or a slideshow. To change the default view for your gallery from a grid to a list, check the “Display thumbnails as a list” setting.
Thumbnails per Page:
Image galleries display eight thumbnails per page by default. Displaying fewer images per page may mean the gallery loads more quickly, while more images per page can mean fewer clicks for visitors. If you would like to modify the number of images displayed per page of the image gallery, enter the desired number.
Do Not Display Keywords below Download Buttons:
Use this setting to disable the keywords section on the right side of image pages, if keywords are present.
Display a Slideshow in the Repository
If you are a site-level administrator, you may add any gallery’s slideshow to any publication or community homepage.
To display an image slideshow on another publication or community homepage:
- Go to the publication/community’s Configuration tab.
- In the Image Slideshow section, complete the fields for URL, width, and height. For the URL, enter the Digital Commons gallery URL followed by /gallery.rss.
- Press Save Changes.
- Click the Update link for that context (e.g., Update ir_community). If desired, you may use the preview link to confirm the size and display of your slideshow prior to updating.
Dynamic slideshows may also be added to the homepage of Digital Commons to highlight featured collections, glimpses of academic life, or the value of depositing research into an IR:

Display a Content Carousel in the Repository
In addition to the slideshow display, Digital Commons also offers a Content Carousel. This option can enliven the homepage of a repository or any community or publication (series, journal, etc.) with both images and their key metadata.

Administrators can choose any image gallery in Digital Commons and, using this feature, present the images and metadata in a display allowing visitors to advance, rewind, pause, or click to see the full metadata record.
To display a Content Carousel on another publication or community homepage:
- Go to the publication/community’s Configuration tab.
- In the Content Carousel section, enter the full URL of the source image gallery (e.g., ir.domain.edu/gallery/).
- Press Save Changes.
- Click the Update link for that context (e.g., Update ir_community).
Display Images on External Sites
Every image gallery in Digital Commons has a built-in RSS feed, publicly available from the “Notify me via email or RSS” sidebar link. External websites such as library, conference, or departmental webpages can use RSS feeds to display images posted in Digital Commons. (For assistance with implementation on an external website, it may be necessary to contact the site’s webmaster for support.)
Frequently Asked Questions
Which image file types does the system support?
The image gallery supports popular file types including TIFF, JPEG, BMP, PNG, and GIF.
How large an image can you upload into the system?
The practical size limit for individual images depends on what you are able to upload and what you expect site visitors will be able to download. Depending on browser settings and Internet connection, site visitors begin to have trouble with files in the 20–100 MB range.
How does Digital Commons handle metadata embedded in photographs?
Digital Commons cannot embed metadata into the images themselves, nor does it read or extract metadata that is already embedded in uploaded images. If your images do have embedded metadata, and you do not want to reenter it to upload them into Digital Commons, determine if you can export the metadata from the images using your current software system. If you can output the metadata to an Excel spreadsheet or XML format, then you should be able to use that to batch upload the images into the gallery. This would create metadata that is associated with the images, not embedded in the images themselves. See Batch Upload, Export, and Revise for more about batch imports.
Can I restrict access to image galleries?
Applying access control prevents unauthenticated visitors from downloading the original image. Visitors will continue to see the thumbnail and medium-sized images that are created by the system for preview purposes, but not the pan and zoom viewer. You may wish to display Creative Commons licenses if the thumbnail and medium-sized images should be restricted as well.
Do all three file sizes trigger download counts?
Only the “original” size photo will trigger a download count. If submissions include the creators’ email addresses, they will receive periodic emails with their download counts, too.
 Digital Commons Help Center